
New to using the Motorcycle? Getting hands-on with your motorcycle may be easier than you think…
Trust us when we say that… it’s all about understanding the essentials!
10 maintenance tasks to do yourself
YOU DON’T have to have the absolute mechanical know-how of some high-fie technician to accomplish simple home-servicing tasks for your vehicle; some decent tools and a little common sense are all that you need to keep your motorbike in tip-top shape.
Ideally, get hold of a vehicle/mechanical manual for your motorbike for a clear and better understanding of how each job should be undertaken. Most of the manuals will give pictures with proper details regarding each part of the process; concerning the motorbike maintenance, a good manual will also list the tools you’ll need to complete the job. Find yours here.
Tools are like knives to a chef; using good ones is half the battle. Save the under-seat toolkit for roadside emergencies and invest in quality for home maintenance.
When it comes to motorcycles, slight do-it-yourself maintenance and jobs could save you money and help keep your motorcycle safe and also empower you. When you do things your way with your very own hands there’s a sense of confidence every time that you would feel whenever you ride the bike that everything’s just right. DIY brings you peace that all is well with your vehicle.
Here are top tips for understanding and learning your own motorcycle maintenance.
In practice, the necessities of each of these jobs can vary depending on the model of the bike. It is advised to consult the owner’s manual before beginning to take on these jobs and educate yourself concerning matters such as the position of filters and plugs, and which parts you an individual must remove to access them; proper quantities and types of various fluids, and the needed intervals for changing them; and torque stipulations for reinstalling nuts and bolts to the proper tightness. For bikes, which lack a centre stand, a rear stand device is advised to position them upright.
If you’re lacking mechanical confidence, ask someone more experienced to help.
1. TYRES
A simple question to be known when and is asked is…When was the last time you checked your bike’s tyre pressures? Well, the ideal answer is, it should be checked weekly, but we usually forget or don’t realize is what a crucial element of bike set-up is.
Under-inflated tyres distress the handling and braking of the motorbike, as the lack of pressure in tyres means the tyre wall or the tyre isn’t firm enough to properly cope with the pressure on it. Over-inflation of bike tyre can reduce the size of the contact of the bike tyres on the road, affecting grip. One pro-tip is to use a quality pressure gauge to precisely check the pressures. To be specific and more precise consult the manual for the desired correct pressures. One thing to remember is that your tyres may need more pressure if you regularly ride with a passenger seating passenger. Always check pressures on the tyres when they are cold.
While you’re at it, check the overall condition and tread depth.
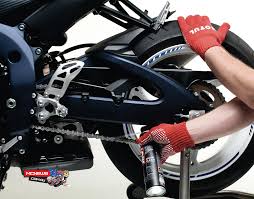
2. Chain tension
INCORRECT chain tension can make for premature sprocket and gearbox wear, rough gear-shifts and snatchy transmission. It can also reduce rear suspension travel and limit the life of the drive chain.
Check your motorbike manual for how to adjust your bike’s chain to the accurate tension. Remember while setting the tension with some load on the motorbike (preferably with someone on it) as the chain will tighten up once a rider is riding the bike. Refer to the motorbike manual for the precise torque settings for each bolt and nut in the bike – ensure to use correct pressure and force when retightening. You’ll need a good torque wrench to do this properly.
Remember to also lubricate the chain while you’re at it, as this will prolong its life.
3. Battery
MOST BATTERIES in the motorbike are positioned beneath a bike’s seat or petrol tank, so it’s hardly surprising many times it gets overlooked when it comes to routine motorbike maintenance. When a battery becomes discharged, it usually means the end of the battery life, so tedious checks should be made on the motorbike condition. Preferably, it is advised to remove the battery from its holder in the motorbike before carrying out any job. Remember, batteries contain strong acid, which can be damaging if it comes into contact with the skin.
One thing more is to check the acid level in the motorbike battery by placing it on a level surface. If the level’s low then you need to top up with de-ionised water before placing the battery on charge, using a car or motorcycle charger. Remember not to overfill the batteries, as the acid will drain out the overflow pipe when you’re on the road riding. Many modern batteries sold today are sealed, so you won’t be able to top them up manually as was possible before. Greasing your battery terminals before replacing them in the motorbike will help avoid erosion. A point to remember is not to touch both terminals together.
4. Coolant
DO YOU know how to check your bike’s coolant level?
It’s another job that’s often ignored but only takes a few minutes to do.
Check your motorbike guidebook to locate a motorbike’s coolant expansion tank if it possesses one. High and low levels of the coolant should be marked on the outside of the transparent tank. On the other hand, remove the radiator packing cap to check the level of the coolant. This check should only be performed when the engine is cold. Changing the coolant, all in all is also an easy job and will take about 30 minutes only.
Find the drain plug. It may be located near the water pump of a motorbike. When the engine is stone cold, remove the plug to drain the coolant. Always check the motorbike handbook to ensure you’re following the right practice for your bike. Once the system back is drained, replace the drain plug before putting in a new batch of coolant using a 50/50 mix of anti-freeze and de-ionised water.
Fill to the commended level and squeeze radiator hoses to eject unwanted air. Check the level again of the coolant and after your first test ride and top up if necessary.
5. Oil and filter change
CHANGING a motorbike’s oil and filter isn’t a lot more difficult than refreshing the coolant system of a motorbike; all you need to do the job are the right tools, decent oil and the right filter. Check the provided handbook by the motorbike manufacturer for a detailed explanation of the steps before going ahead with the job. As for the first attempt, contemplate asking somebody more experienced to supervise progress from start to finish. This would help you to determine that all steps have been taken correctly.
Let’s go through the process, while the engine is warm, remove the motorbike’s oil filler cap, place a dish under the bike and remove the sump plug. Ensure 100% that the right bolt is removed; it should be the biggest one on the sump, usually, it is on the bottom or on the side. Once the oil’s completely drained, remove the filter, either by hand if you think you have the muscle for it or use a filter removal wrench.
Replace the sump plug and tighten the bolts to the correct torque setting as endorsed in the motorbike handbook before whirling on a new filter. Smudge the rubber filter gasket in clean oil before tightening it by hand. Squeeze it up half a turn with the filter wrench. Replenish the engine with the suggested amount of new oil. Start the motorbike, check for the oil leaks and halt the engine again. Give the oil five minutes to drain back into the sump before checking the level again.
Add oil if necessary or remove some with an oil syringe. Simples.
6. Oil and adjust cables
OILING AND ADUSTING your motorbike’s cables can be a reason for a smoother, more responsive riding experience. Over the period, the grease that was put into the cable housing during the manufacturing of the motorbike will reduce, leaving a motorbike’s throttle or clutch action compromised. So it’s worth using out some cash for a dedicated hydraulic cable oiler. While oiling cables of a motorbike, adjust them to take out any unwanted slack. This will help the motorbike to perform better.
7. Spark plugs
CHANGING a motorbike spark plugs isn’t a job that usually needs regular attention. Check the mileage and the manufacturer handbook to see whether it’s due or when is it due. Changing the plugs on most of the motorbikes takes just a few minutes, while others can take a beginner quite a lot of hours and may also require the removal of the radiator. If you Got a Honda? Consult your motorbike dealer, as it can encompass draining the cooling system. Make sure of procuring the correct plugs for a motorbike; Check the manufacturer handbook for the correct gap; you’ll need feeler gauges to set it correctly.
Pro-tip: Remove one plug at a time from the motorbike to avoid mixing up the HT leads. Cautiously avoid overtightening them. Screw-in by hand and nip them up a quarter-turn with a plug wrench.
8. Grease
The MOTORBIKE will gain value from a spray of the right sort of grease in the right places of the motorbike.
Workaround the motorbike with spray grease, lubricate the footrests, joints, levers, locks, stand hinges and, as aforementioned, regarding the cables. Just be cautious and vigilant that you don’t spray anywhere near brakes. If you’re feeling a little more adventurous, you may want to try greasing other parts of the bike, like the wheel spindles or swingarm, for example. Check the manufacturer handbook for the position of any greasing points.
If you’ve really got a problem with your motorbike, invest in a tin of copper grease, so you can remove non-structural bolts from the machine (like brake calliper bolts) and then apply just a bit of grease to avoid them seizing up over the period. Just don’t forget to make it tighter to the correct torque setting. Not sure which sort of grease to use for each job? Consult your local dealer or accessory shop for the best advice.
9. Brake pads
REPLACING a motorbike brake pads sounds fairly intensive and exhaustive task? Right? But is actually a pretty upfront job. Being said that, there are clear safety consequences of getting the job done wrong, so before starting the job seek guidance from someone more experienced or use a manufacturer if you’re unsure. Obviously, the right tools and the correct pads are a starting point to the brake changing process. Some callipers in motorbikes let you replace pads without removing the calliper from the disc. You can simply access the pads by removing a plate on the back of the calliper and then a holding pin through the pads.
Well, the brake pad changing process can be intricate and delicate. We should also not forget that brakes are very sensitive can cause some fatal accidents if not functioning properly. So while you are in the process of changing motorbike brake pads it should be done with caution and care.
The process of changing the pads is simple, and a few minutes spent on its maintenance can save not only thousands of rupees spent on the repairing of the motorbike, depending on which model and make you possess. It would also save you the hassle and the most important of all any accident that might harm you otherwise.
10. Clean it
Well, well, the most prominent and the most important point!
Clean the Motorbike!! UNLESS YOU’RE a traveller and don’t have time, washing a motorbike after every use is the best way to keep that “new look” of a motorbike, especially it is important in winter when there is corrosive salt on the roads. Cleaning a motorbike thoroughly on a regular basis is a way to overlook anything or any spot to have a mechanically amiss. Well, let’s start the cleaning; soap the bike down with plenty of hot water, laced with a good quality motorbike shampoo. Do not use any available washing-up liquid as it can be corrosive to the motorbike, damaging the body of the motorbike.
With some bike cleaning solutions, the commendation is to wash the bike with water before spraying the cleaner on and leave it for a few minutes. Then take a clean scrubber or dishcloth and warm water to the whole bike. At first start with the bodywork and screen first, to avoid scratches from gravel picked up by the cloth or sponge, to do check the scrubber every now and then.
It sounds exasperating but with an effective cleaning liquid like WD-40 the dirt drops off the motorbike immediately. For the chain, use a dedicated chain cleaner for the motorbike. Again, a good one will make light work of it.
Wash off these cleaning agents with plenty of freshwaters. While cleaning avoids bearings and electrics if using a pressure washer. Apply a liberal covering of anti-corrosion spray, to keep corrosion at bay in winter and if you living in Karachi, all year round as the air-sea mixed with such water particles can be coercive for the motorbike.
Get Bike Insurance!
To be honest! If you religiously follow the aforementioned maintenance tips for your motorbike if you have got yourself covered against any wear and tear expense. But there are certain events, instances or incidents which are unpredictable. They can appear out of nowhere and lead to big expenditure affecting the budgeting and whole money cycle of the household. Things like a slip on a slippery road, a collision at a blind corner, hit from behind, emergency break to save a cat or dog, speeding of a vehicle, parked motorbike crash are a few of the scenarios that are unexpected and uncalled for yet can happen anytime or any day. To secure yourself in the face of such unpleasant encounters it is pertinent to have bike insurance for your vehicle. The bike insurance would not only assure peace of mind but would also be a financial cushion at the time of emergency.
Last and Final thing…
Pay Attention To your Motorcycle!!
Following some commonsense maintenance processes and following all of the commendations provided by a motorbike manufacturer handbook will go a long way toward maximizing its condition even over many years of hard use. Try not to take your motorbike for granted. Be vigilant about it and take care of it!
If the feeling of the motorbike drive changes or you start to hear changes in how the engine sounds, don’t ignore those signs, the early you detect the better it is. This goes hand in hand with expanding your general motorcycle knowledge and your understanding of your own bike in particular. Once you see the warning signs of a potential problem, take action or take it to a mechanic right away. Last but not least preparing yourself and your motorbike for the unpredictable and get it INSURED!

